Infinite Scrolling and the Tiling Logic
Sometimes, your app’s UX designer wants infinite scrolling for one of your collection views when the data displayed is limited. When a user scrolls to the very end of the data set, the first piece of data reappears on screen; if the use scrolls the other way, the last piece of data reappears.

Traditionally, the solution for an infinite UICollectionView is to have a large duplicated data set (for example, 1000 * original data set) to trick the user into believing the collection view is infinite. Because the collection view has a cell reuse mechanism, so performance won’t be a big issue. But, a large duplicated data will inevitably introduce extra overhead by having a large amount of UICollectionViewLayoutAttributes. Besides, what if the user is bored to death and just sits there for a day to scroll your collection view? The chance for this to happen might be small, but, after all, having a large duplicated data set isn’t a very elegant solution.
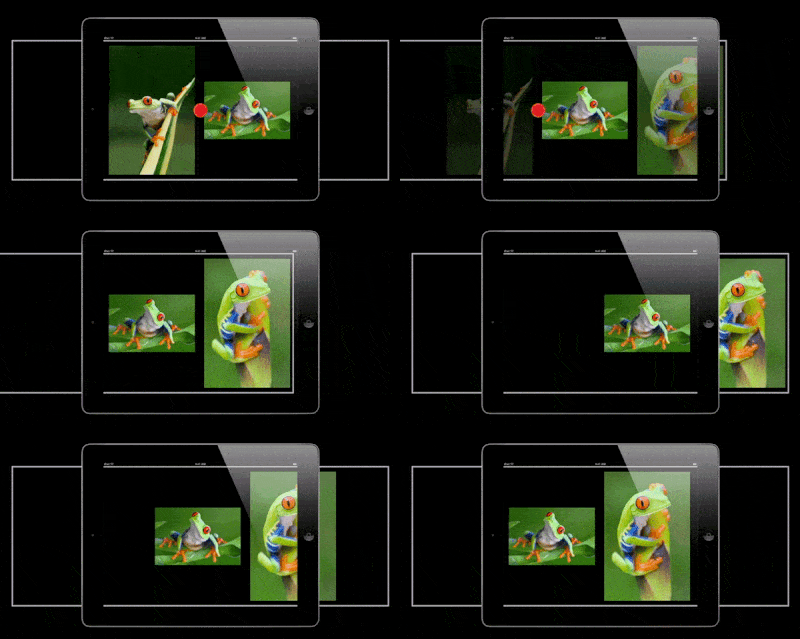
In fact, one of the WWDC sessions - Advanced ScrollView Techniques explained how to implement a infinite scrolling scroll view using a technique called tiling.
In this post, we are going to explain what tiling is and how a very similar approach can be applied to collection view for infinite scrolling.
Before reading any further, you can check out this Demo project. This Demo project demonstrates how to make both scroll view and collection view scroll infinitely. The Demo code is not rigorously tested and some parts are coupled tightly with others, if you want to use it in production, do it with caution.
UIScrollView Infinite Scrolling
There are basically two things you have to do before you can have a infinitely-scrolling scroll view:
- Never let the scroll view scroll to it’s edge. Once you let that happen, the bouncing effect would tell the user, s/he reaches the end.
- Wraps the data set around so that it appears to be looping.
For a scroll view to scroll, you should first set it’s contentSize to be larger than its bounds.size. So, in the Demo code, we subclass UIScrollView. In its init method, we set a huge contentSize to it.
- (instancetype)initWithFrame:(CGRect)frame {
    self = [super initWithFrame:frame];
    if (self) {
        self.contentSize = (CGSize){kLargeScrollContentWidth,
            CGRectGetHeight(frame)};
        self.backgroundColor = [UIColor blueColor];

	/*
	....
	*/

        // hide horizontal scroll indicator so our recentering trick is not revealed
        [self setShowsHorizontalScrollIndicator:NO];

    }
    return self;
}
Overriding -(void)layoutSubviews and a resetting the scroll view’s contentOffset to be a center value when the user scrolls it to reach our preset boundary.
- (void)layoutSubviews {
    [super layoutSubviews];
    self.contentSize = (CGSize){kLargeScrollContentWidth,
        CGRectGetHeight(self.bounds)};
    [self recenterIfNecessary];

    // tile content in visible bounds
    CGRect visibleBounds = [self convertRect:[self bounds] toView:self.imageContainer];
    CGFloat minimumVisibleX = CGRectGetMinX(visibleBounds);
    CGFloat maximumVisibleX = CGRectGetMaxX(visibleBounds);

    [self tileImagesFromMinX:minimumVisibleX toMaxX:maximumVisibleX];
}

- (void)recenterIfNecessary {
    CGPoint contentOffset = self.contentOffset;
    CGFloat centerOffsetX = (self.contentSize.width - self.bounds.size.width) * 0.5;
    CGFloat offsetDif = fabs(contentOffset.x - centerOffsetX);
    if (offsetDif > 100) {
        self.contentOffset = (CGPoint){centerOffsetX, contentOffset.y};

        // move content by the same amount so it appears to stay still
        for (UIImageView *imageView in self.visibleImageViews) {
            CGPoint center = [self.imageContainer convertPoint:imageView.center toView:self];
            center.x += (centerOffsetX - contentOffset.x);
            imageView.center = [self convertPoint:center toView:self.imageContainer];
        }
    }
}
If you read the - (void)recenterIfNecessary method implementation, you will find it basically does two things:
- Find a content offset x value (
centerOffsetX) so that the very middle part of the content can be shown. Calculate the difference between the current content offset x value andcenterOffsetX. If the difference is larger than our preset threshold (100), reset the content offset so it snaps back to center. - When the content offset snaps to show the content in the center, all the currently visible views should also be shifted by the same amount.

Because this process is not animated and it happens in the same layout call, the user won’t notice any difference visually.
The reason to do it in in - (void)layoutSubviews method is we are, indeed, laying out subviews (shifting visible images in the scroll view). The other important one is - (void)layoutSubviews will be called at fine-grained intervals when the scroll view’s contentOffset changes, which gives us a perfect chance to recenter content and shift subviews accordingly.
After shifting visible content back, the scroll view itself has extra scrollable area, so the scrolling will not end. All the work left to us now, is to tile new subviews when new scrollable area appears on screen. Here is where the tiling logic comes in:
- (void)tileImagesFromMinX:(CGFloat)minimumVisibleX toMaxX:(CGFloat)maximumVisibleX {
    // the upcoming tiling logic depends on there already being at least one image view in the visibleImageViews array, so
    // to kick off the tiling we need to make sure there's at least one image view
    if ([self.visibleImageViews count] == 0) {
        [self appendNewImageOnRight:minimumVisibleX];
    }

    // add image views that are missing on right side
    UIImageView *lastImageView = [self.visibleImageViews lastObject];
    CGFloat rightEdge = CGRectGetMaxX([lastImageView frame]);
    while (rightEdge < maximumVisibleX) {
        rightEdge = [self appendNewImageOnRight:rightEdge];
    }

    // add image views that are missing on left side
    UIImageView *firstImageView = self.visibleImageViews[0];
    CGFloat leftEdge = CGRectGetMinX([firstImageView frame]);
    while (leftEdge > minimumVisibleX) {
        leftEdge = [self insertNewImageOnLeft:leftEdge];
    }

    // remove image views that have fallen off right edge
    lastImageView = [self.visibleImageViews lastObject];
    while ([lastImageView frame].origin.x > maximumVisibleX) {
        [lastImageView removeFromSuperview];
        [self.visibleImageViews removeLastObject];
        [self.imageViewPool addObject:lastImageView];
        lastImageView = [self.visibleImageViews lastObject];
    }

    // remove image views that have fallen off left edge
    firstImageView = self.visibleImageViews[0];
    while (CGRectGetMaxX([firstImageView frame]) < minimumVisibleX) {
        [firstImageView removeFromSuperview];
        [self.visibleImageViews removeObjectAtIndex:0];
        [self.imageViewPool addObject:firstImageView];
        firstImageView = self.visibleImageViews[0];
    }
}

- (CGFloat)appendNewImageOnRight:(CGFloat)originX {
    UIImageView *lastImageView = self.visibleImageViews.lastObject;
    NSInteger imageIndex = (lastImageView) ?
    ([self imageIndexWithImageViewIndex:lastImageView.tag] + 1) % self.images.count :
    0;
    UIImageView *imageView = [self imageViewWithImageIndex:imageIndex];

    if (imageView) {
        [self.visibleImageViews addObject:imageView];
        CGRect imageRect = (CGRect){originX, 0, kImageWidhtHeight, kImageWidhtHeight};
        imageView.frame = imageRect;
        [self.imageContainer addSubview:imageView];
    }

    return MAX(originX, CGRectGetMaxX(imageView.frame));
}

- (CGFloat)insertNewImageOnLeft:(CGFloat)left {
    UIImageView *firstImageView = self.visibleImageViews.firstObject;
    NSInteger imageIndex = (firstImageView) ?
    (([self imageIndexWithImageViewIndex:firstImageView.tag] - 1) >=0 ?
     [self imageIndexWithImageViewIndex:firstImageView.tag] - 1 :
     [self imageIndexWithImageViewIndex:firstImageView.tag] - 1 + self.images.count) :
    0;
    UIImageView *imageView = [self imageViewWithImageIndex:imageIndex];

    if (imageView) {
        [self.visibleImageViews insertObject:imageView atIndex:0];
        CGRect imageRect = (CGRect){left - kImageWidhtHeight, 0,
            kImageWidhtHeight, kImageWidhtHeight};
        imageView.frame = imageRect;
        [self.imageContainer addSubview:imageView];
    }

    return MIN(left, CGRectGetMinX(imageView.frame));
}

- (UIImageView *)imageViewWithImageIndex:(NSInteger)imageIndex {
    if (imageIndex >= self.images.count) {
        return nil;
    }

    UIImage *image = [self.images objectAtIndex:imageIndex];
    UIImageView *imageView = nil;
    if (self.imageViewPool.count) {
        imageView = [self.imageViewPool firstObject];
        imageView.image = image;
        [self.imageViewPool removeObject:imageView];
    }
    else {
        imageView = [[UIImageView alloc] initWithImage:image];
    }
    imageView.tag = [self imageViewIndexWithImageIndex:imageIndex];
    return imageView;
}
Even though we have a large chunk of code devoted to subview tiling, the logic is actually very simple:
- Find the area [minimumVisibleX, maximumVisibleX] where the tiling need to happen.
- Add at least one subview for the tiling to kick off.
- Tile the right side rectangle until it’s filled. Do the same thing for the left side.
// add image views that are missing on right side UIImageView *lastImageView = [self.visibleImageViews lastObject]; CGFloat rightEdge = CGRectGetMaxX([lastImageView frame]); while (rightEdge < maximumVisibleX) { rightEdge = [self appendNewImageOnRight:rightEdge]; } // add image views that are missing on left side UIImageView *firstImageView = self.visibleImageViews[0]; CGFloat leftEdge = CGRectGetMinX([firstImageView frame]); while (leftEdge > minimumVisibleX) { leftEdge = [self insertNewImageOnLeft:leftEdge]; } - Update manged visible subviews.
Then we are done.
So, to recap. Infinite-scrolling UIScrollView needs us to do two things:
- Resetting the
contentOffsetso that scrolling never halts at the boundary; - Tile the subviews on both left and right when scroll to show new subviews;
UICollectionView Infinite Scrolling
However, for UICollectionView, subview tiling is not controlled by us at all. In fact, the cell reuse mechanism is very likely to be a more complicated tiling mentioned above, but the exact implementation under the hood is not known.
So, tiling is the second step we can’t control. But, what we can do is to trick the collection view to tail exactly what we want by padding a few extra duplicated pieces of data and implementing it’s cellForItemAtIndexPath: method to return a correct piece of data.
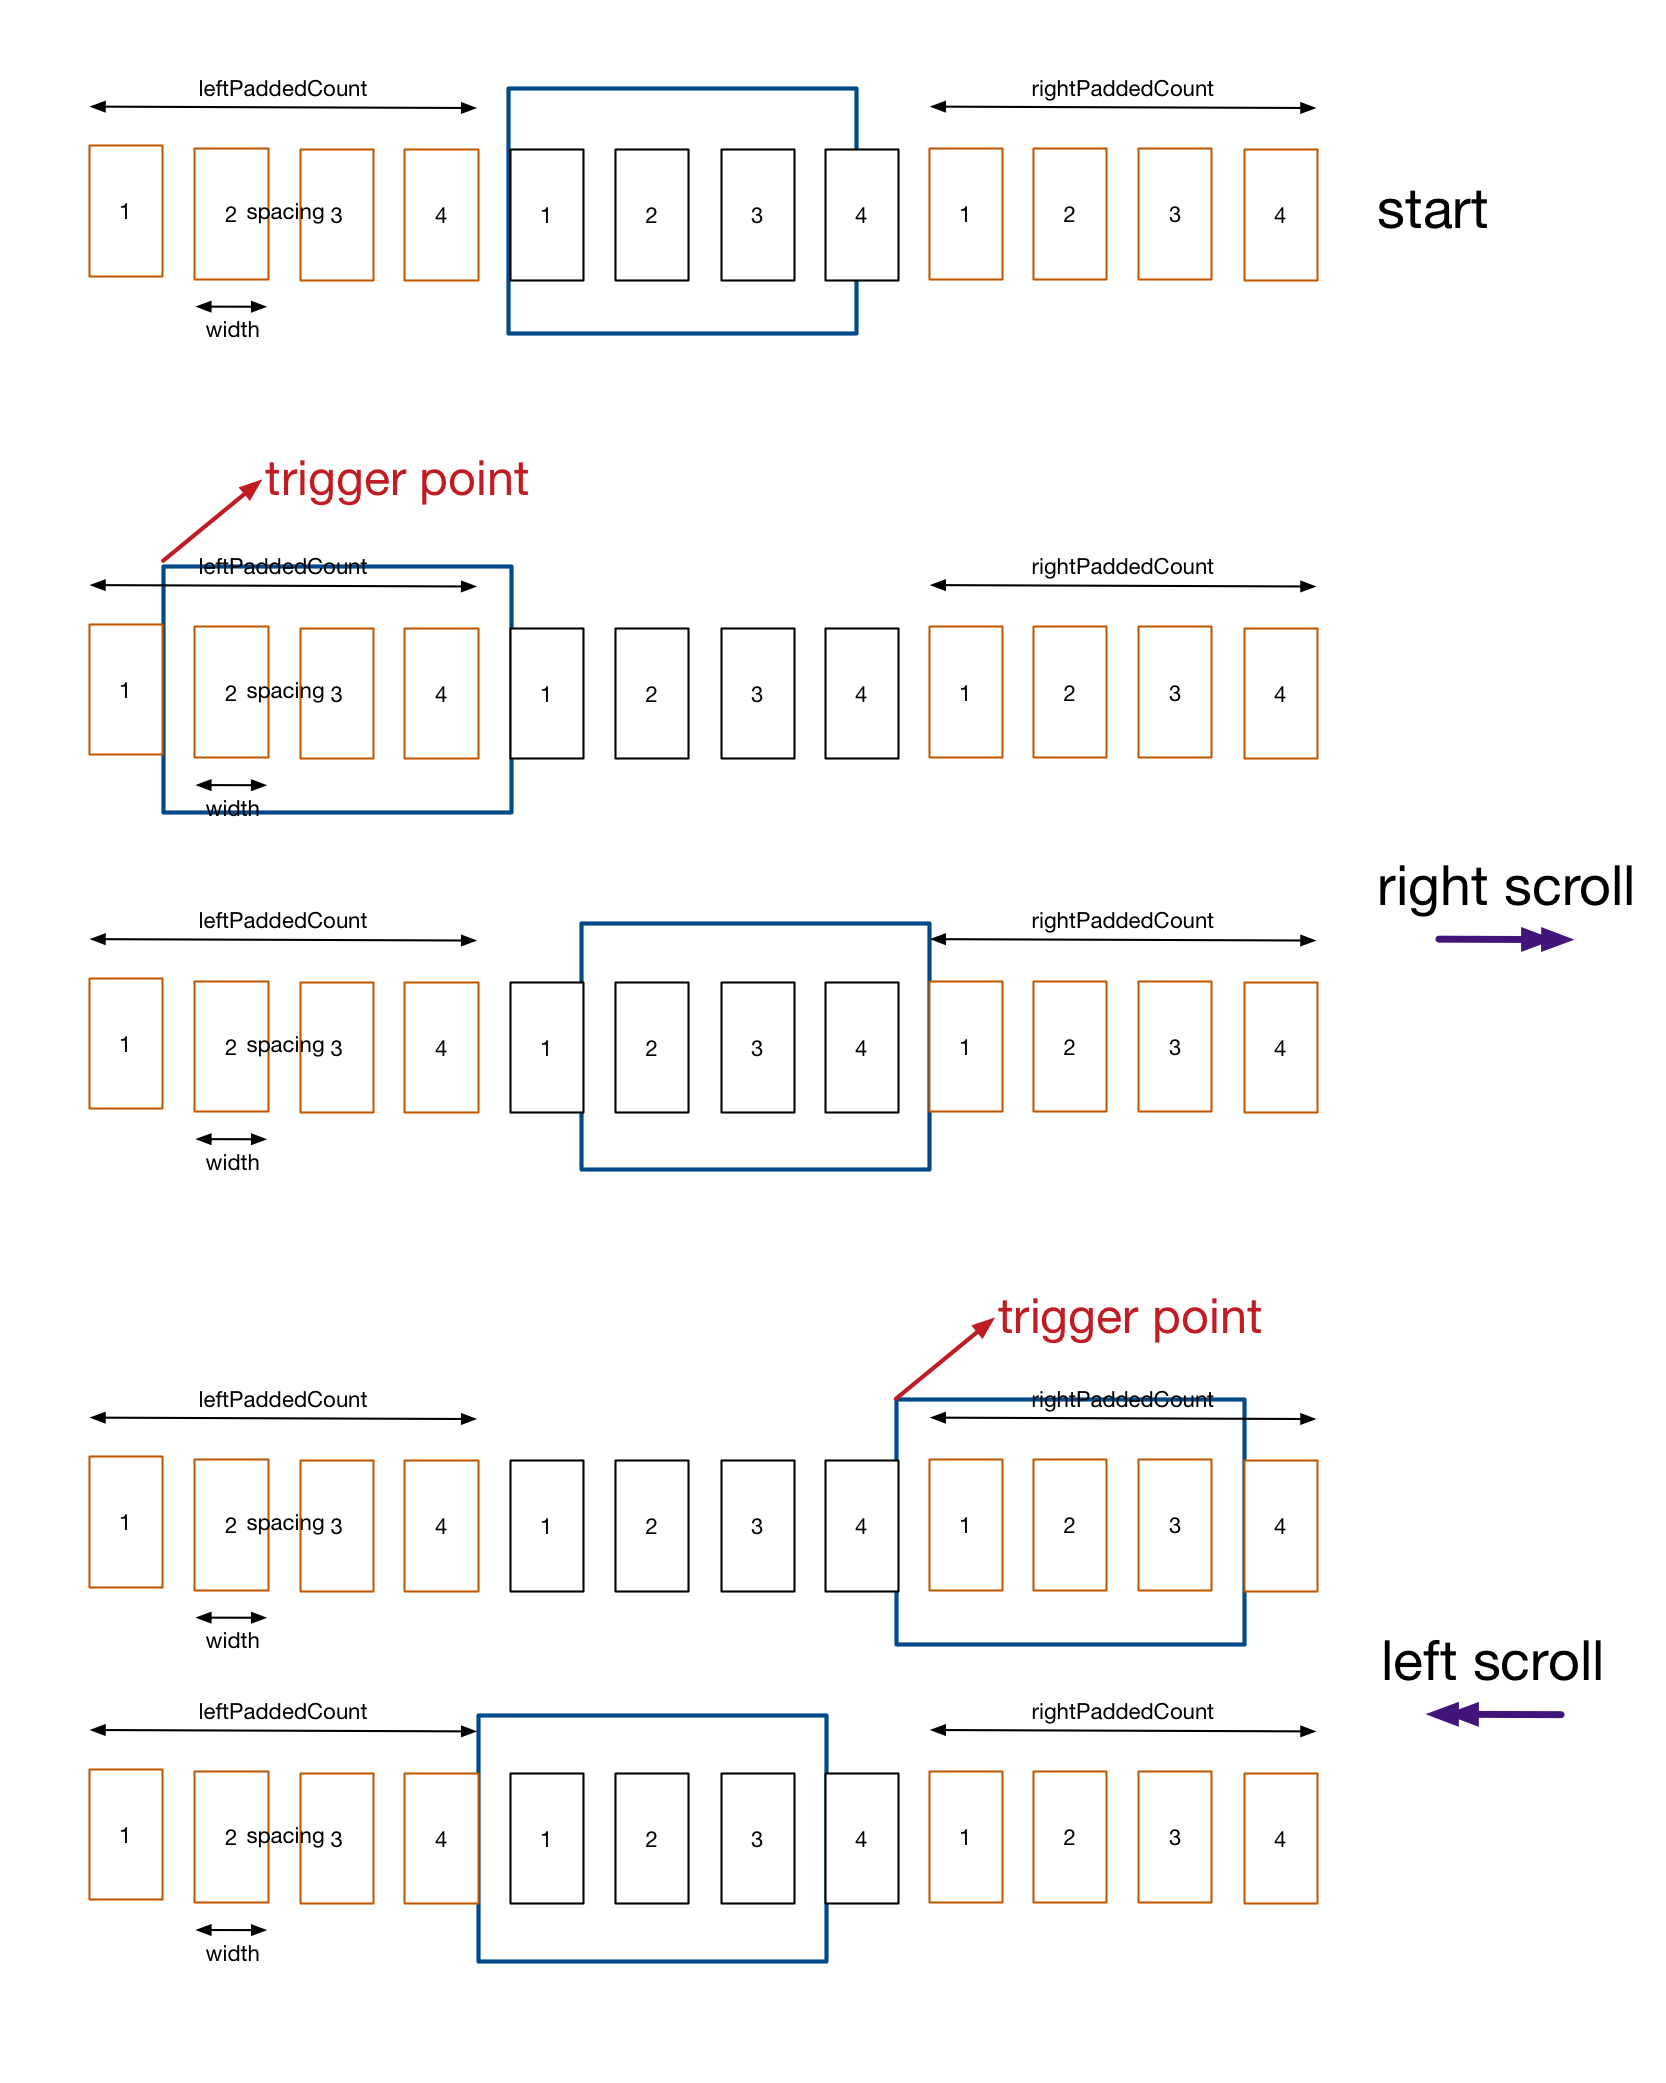
I drew an illustration to show how this works:

The infinite scrolling is made possible by padding extra items at both the left and right side (brown rectangles) of the original data set (black rectangles) to achieve larger scrollable area; This is similar to having a large duplicated data set, but difference is the amount.
- At start, the collection view’s
contentOffsetis calculated to show only the original data set (drawn in black rectangles); - When the user scrolls right and contentOffset hits the trigger value, we reset contentOffset to show same visual results; but actually padded data set;
- When the user scrolls left, the same logic is used.
So, the heavy lifting is in calculating how many items should be padded both on the left and right side. If you take a look at the illustration, you will find that a minimum of one extra screen of items should be padded on left and also, another extra screen on the right. The exact amount padded depends on how many items are in the original data set and how large your item size is.
The calculation is carried out in JWInfiniteFlowLayout file. Since it’s demo code, inappropriate coding do exist. For example, the property minItemSpacing is used as the actual item spacing.</span> So, use it with caution.
- (void)padExtraItems {
    NSInteger itemsCount = self.dataSet.count;
    if (!itemsCount) {
        return;
    }
    CGFloat itemSpan = itemsCount * (self.minItemSpacing + self.itemSize.width) - self.minItemSpacing;
    _itemSpan = itemSpan;
    CGFloat collectionWidth = self.collectionView.bounds.size.width;
    //if original items can't fit into the bounds
    if (itemSpan > collectionWidth) {
        NSInteger oneScreenItemCount = floor(collectionWidth / (self.minItemSpacing + self.itemSize.width));
        _leftPaddedCount = oneScreenItemCount + 1;
        _rightPaddedCount = _leftPaddedCount;
        _minScrollableContentOffsetX = _leftPaddedCount * (self.itemSize.width + self.minItemSpacing) - collectionWidth;
        _maxScrollableContentOffsetX = (_leftPaddedCount + itemsCount) * (self.itemSize.width + self.minItemSpacing) - self.minItemSpacing;
    }
    else {
        NSInteger itemsTotal =
        floor((3 * collectionWidth - itemSpan)/(self.minItemSpacing + self.itemSize.width)) + 2;
        NSInteger itemsPadded = itemsTotal - itemsCount;
        _leftPaddedCount = floor((1 * collectionWidth)/(self.minItemSpacing + self.itemSize.width)) + 1;
        _rightPaddedCount = itemsPadded - _leftPaddedCount;
        _minScrollableContentOffsetX = _leftPaddedCount * (self.itemSize.width + self.minItemSpacing) - collectionWidth;
        _maxScrollableContentOffsetX = (_leftPaddedCount + itemsCount) * (self.itemSize.width + self.minItemSpacing) - self.minItemSpacing;
    }
}
When padding is done, all you need to do is to return correct subview in collection view’s data source methods and reset its contentOffset in its delegate method:
- (NSInteger)collectionView:(UICollectionView *)collectionView
     numberOfItemsInSection:(NSInteger)section {
    JWInfiniteFlowLayout *layout = (JWInfiniteFlowLayout *)collectionView.collectionViewLayout;
    return layout.leftPaddedCount + self.images.count + layout.rightPaddedCount;
}

- (UICollectionViewCell *)collectionView:(UICollectionView *)collectionView
                  cellForItemAtIndexPath:(NSIndexPath *)indexPath {
    JWInfiniteFlowLayout *layout = (JWInfiniteFlowLayout *)collectionView.collectionViewLayout;
    JWCollectionViewCell *cell =
    [collectionView dequeueReusableCellWithReuseIdentifier:kCollectionCellReuseID
                                              forIndexPath:indexPath];
    NSInteger imageIndex = (indexPath.row - layout.leftPaddedCount < 0) ?
    ((indexPath.row - layout.leftPaddedCount)%(NSInteger)self.images.count + self.images.count)%(NSInteger)self.images.count :
    (indexPath.row - layout.leftPaddedCount)%(NSInteger)self.images.count;
    cell.imageView.image = self.images[imageIndex];
    return cell;
}

- (void)scrollViewDidScroll:(UIScrollView *)scrollView {
    JWInfiniteFlowLayout *layout = (JWInfiniteFlowLayout *)self.infiniteCollection.collectionViewLayout;
    CGPoint currentOffset = scrollView.contentOffset;
    if (scrollView.contentOffset.x < layout.minScrollableContentOffsetX) {
        scrollView.contentOffset = (CGPoint){layout.itemSpan + layout.minItemSpacing + currentOffset.x,
            currentOffset.y};
    }
    else if (scrollView.contentOffset.x > layout.maxScrollableContentOffsetX) {
        scrollView.contentOffset = (CGPoint){currentOffset.x - layout.itemSpan - layout.minItemSpacing,
            currentOffset.y};
    }
}
Now you have a infinite-scrolling collection view.
Update
Some parts of the demo code’s logic is rewritten and open sourced. You can checkout my repo. However, currently it’s not powerful enough. But, more features will be added overtime.